Computers, especially desktops, have come a long way on the path of development. They have evolved quite well. Along with the changes in design, there are considerable changes in specs and processing power as well. Modern PCs mostly rely on HDD or SDD.
But the standard practice is to install a SATA HDD. The space on a Windows PC is divided into partitions. These partitions are named according to alphabets, and the first drive starts from C:/, which is usually the primary drive where Windows is installed.
The rest of the drives can be used for any purpose. These partitions and their storage capacities are decided and created during the first install of Windows on a new Hard Disk. But if you need to create a new partition later at any point of time, do not worry, as it is possible.
These are the multiple ways in which you can create a new partition in Windows. It will neither delete your data nor harm your installed problem. So if you want to create a new partition in Windows quickly, follow any of the ways given below.
Content
How To Create New Partition In Windows.
Given below are easy to follow ways to create a new partition in Windows. You can choose any of these ways according to your requirements and understanding.
Method 1:- Disk Manager.
It is the first method, and in it, we are going to use the inbuilt Disk Manager tool in Windows to create the new partition. Let’s begin it step by step.
Step 1. In Control Panel, head to “System and Security”, then click on Administrative Tools and open Computer Management.

Step 2. Select Disk Management under storage on the left side.
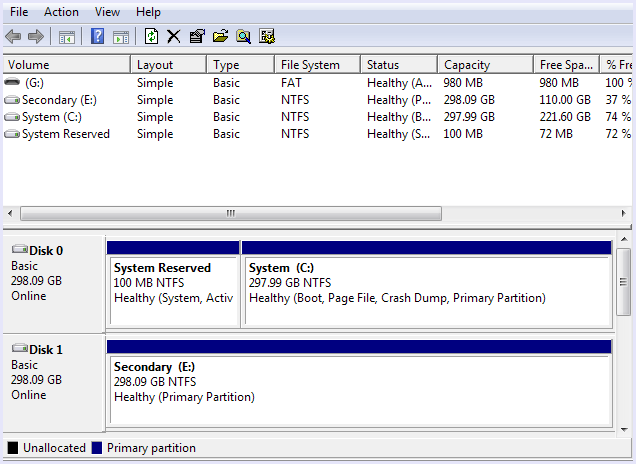
Step 3. Now, if you also see unallocated space, you can skip the steps directly to Step 6, But if you need to make space out of an existing drive, continue below.
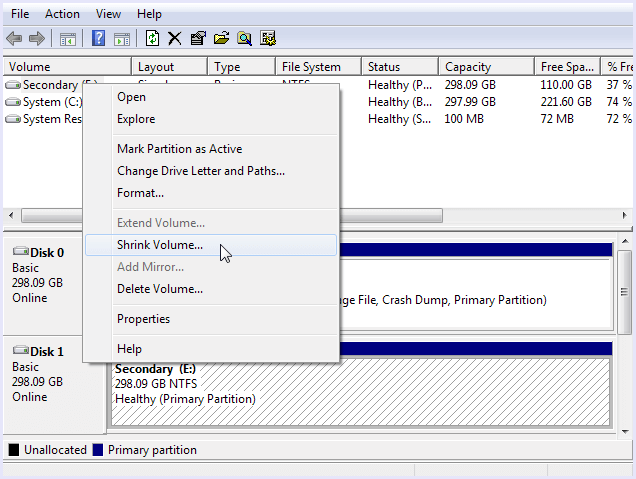
Step 4. Right-Click on the drive, you wish to take space from. It can be any Drive including C: but make sure you do not select “System Reserved”. In the right-click menu, Click on “Shrink”.
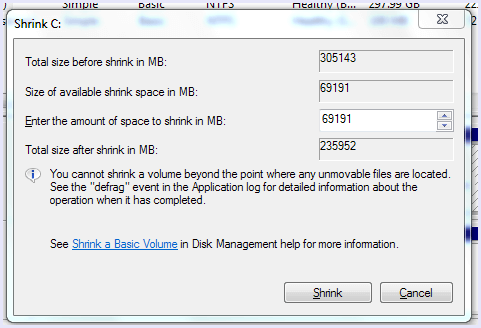
Step 5. Enter the Space you want to extract in MBs. Make sure you use proper conversion and enter the exact amount of space you need. It will be added to unallocated space on your hard disk.
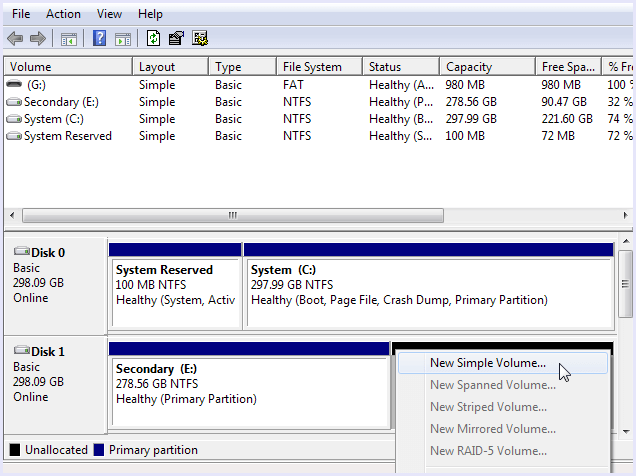
Step 6. Just Right-Click on the unallocated space and select “Simple Volume” in the menu. In the opened wizard, click “Next”.
Step 7. In the next level, enter the number of MBs you want your new volume to be. Make sure to leave a few MBs unallocated.
Step 8. In the next level, assign a drive letter and give the volume any name you desire.
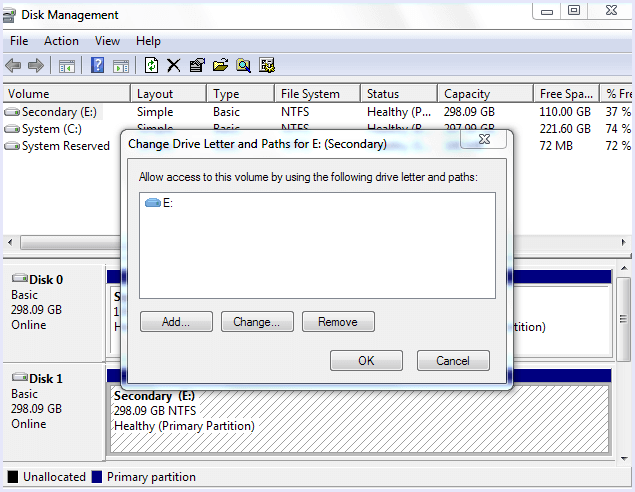
Step 9. Now click on “Finish” and exit the setup. You will soon see the new partition in “This PC”.
Step 10. Please make sure you right-click on the new drive and format it before using it.
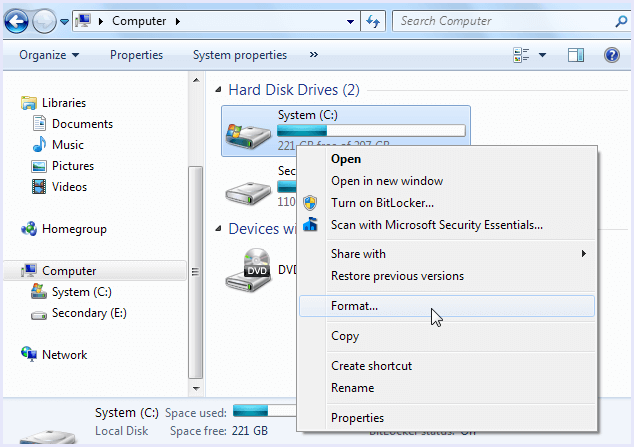
Hence, your new partition is created successfully.
Method 2:- Using MiniTool Partition Wizard.
If you want to create a partition in Windows using a 3rd party software, we have the best one that you can use.
The MiniTool Partition Wizard holds the capabilities of managing all your needs for working with partitions in Windows.
Steps to create a new partition in Windows using MiniTool Partition Wizard are:
Step 1. Download and install Minitool Partition Wizard from the Download Link.
Step 2. Run the installed software and provide Administrative Permissions.
Step 3. If you already have unallocated space on your Hard Disk, you can directly skip stepping 5, but if you need to take space from existing partitions, follow the steps below.
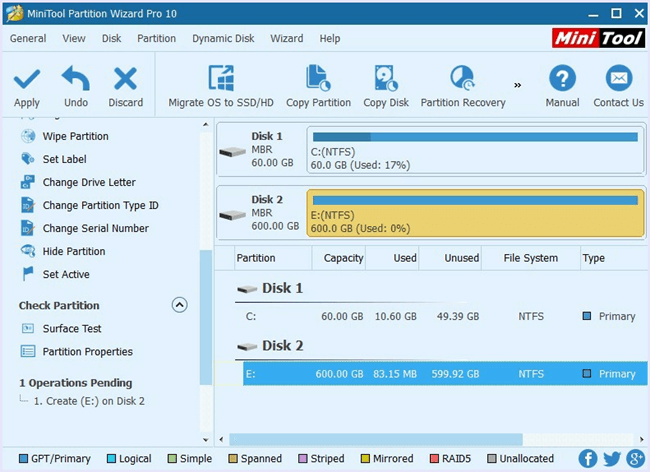
Step 4. Right-click on the drive that you want to extract space from and select “Move/Resize” Partition. Here you can choose the amount of space you want to remove and add to unallocated space.
Step 5. Now in the left pane, under “Partition Management” select “Create Partition” after selecting unallocated space.
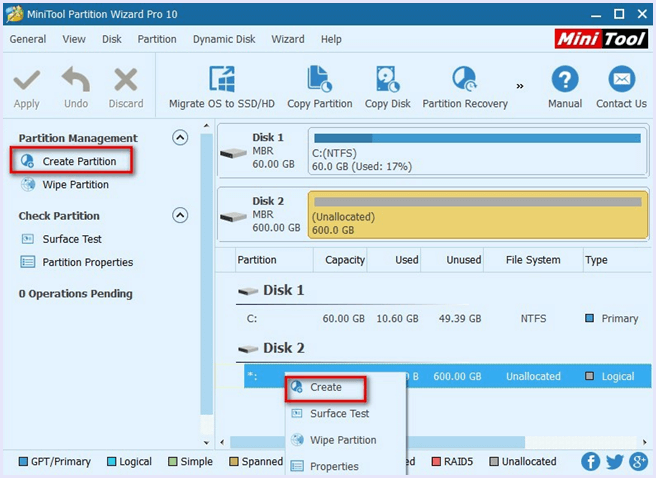
Step 6. In the dialogue box opened, enter the following parameters for your new partition, ie. Label, Drive Letter, File System, Space, Partition Size.
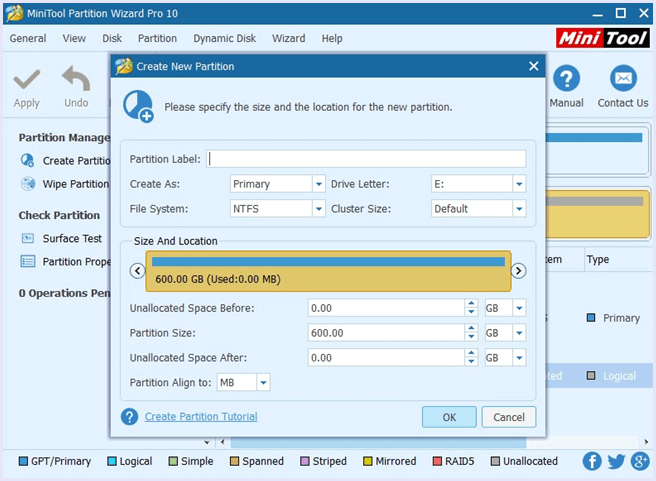
Step 7. Click on Apply button.
Hence, your new partition will be created successfully. Could you make sure your format it before using?
Method 3:- Using CMD Commands (DiskPart).
In this method, we will be able to create a new partition for Hard Drive in Window using a few commands in the Windows command prompt.
Let’s see the complete step by step guide on how to do so along with the necessary commands.
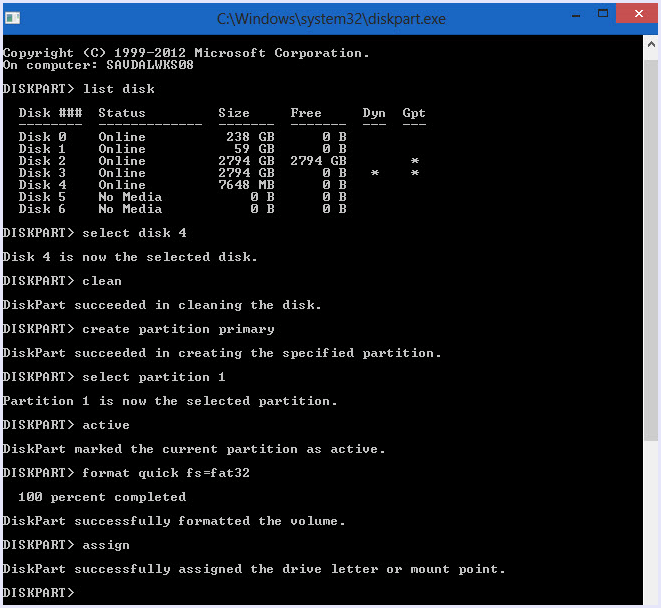
Step 1. Open CMD by right-clicking on it and selecting “Run as Administrator”.
Step 2. Enter the first command as Diskpart.exe
Step 3. At the DISKPART prompt, Enter: LIST DISK (This shows all drives available. Note the drive number you wish to change.)
Step 4. Then enter: Select Disk 1 (This selects the disk that you want to change, so use the number which you noted down in the previous step.)
Step 5. Enter: CREATE PARTITION PRIMARY SIZE=10000 (Enter Size here instead of 1000)
(Change the word PRIMARY to EXTENDED to create an extended partition. Suppose you do not set size such as the above example for 10 GB. Then, the whole available space on the disk will be used for the separation.)
Step 6. Then enter: ASSIGN LETTER=D (Choose a drive letter not already being used.)
Step 7. At last, Enter: Exit
Note:- Use the Command Prompt format command, Disk Administrator or any disk format utility to format the drive — typically using NTFS, of course.
Hence, these are the easy ways to create a new partition in Windows.
In conclusion, these are the best ways to create a new partition in Windows. We hope you must have liked this guide. And, feel free to reach out to us in case you have any query or need any assistance.
